

Design Guides
The veteran of all additive technologies,Stereolithography is known as the original 3D printing process for producing rapid prototypes and show models since 1989. This process (commonly referred to as SLA ) utilizes a UV laser that cures parts one layer at a time in a photo-reactive epoxy resin. Widely regarded as one of the most accurate of the additive technologies, the Stereolithography 3D printing process is a popular choice amongst engineers looking for fine detailed, small featured parts as well as extraordinarily large components.
SLA Design Guides
Tolerances: Layer thickness is 0.1 – 0.2mm. SLA is very accurate in the x and y directions, meaning models are very accurate to CAD. General tolerance is +/- 0.1mm.
Overhangs: Not a problem for SLA due to the supports. Unsupported overhangs will warp.
Walls: SLA can manage very thin walls but QSY do not recommend anything under 0.8 – 1mm.
Holes & Slots: We recommend a minimum of 0.5mm but the larger the better especially as wall thickness or depth increases.
Text & Engraved Details: Are at risk of closing up if not designed with 0.5mm > minimum height.
Mating Parts: Minimum 0.5mm gap between axel and bore or other moving parts.Minimum Clearance = 0.5mm
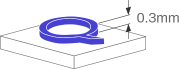
Pins & Embossed Features: Pins ≥ 0.8mm but even then risk breaking. Embossed features ≥ 0.3mm.